Almost There...
by Dermot Tynan in Microtransat
Posted on Monday, June 03, 2013 at 08:00
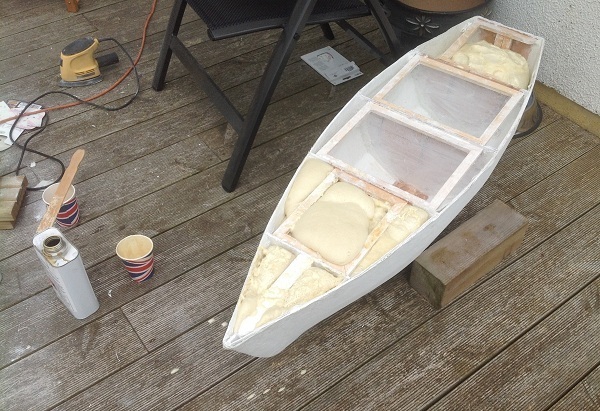
After a lot of sanding, fibreglassing and applying resin, the hull is looking like it is ready for salt water. As you can see from an earlier post (Hull 001 is almost ready for fibreglass), the hull is formed by gluing thin balsa strips to the plywood bulkheads. These strips give the hull its shape, and also provide a modicum of structural integrity. On the outside of this balsa, are 3 layers of 300g chopped-strand matt, finished with a layer of fibreglass tissue. Each layer is impregnated with polyester resin. Likewise, the inside of the hull is coated with two layers of 300g CSM. Ultimately, all of the balsa wood is covered with at least two layers of fibreglass, which is a good idea because fibreglass on its own isn't that strong, and is susceptible to rotting, particularly in warm, humid waters.
This one-off technique is quite common in boat-building circles, and the hardest part is trying to keep the outer hull faired. In the picture, the hull looks well-faired but the truth is somewhat different. Who says the camera never lies! Traditional fibreglass techniques involve a female mould, in which a thick layer of gel coat is painted. From this, several layers of glass are added, and if a balsa core is required, it is added during the process. Ultimately, the boat is pulled from the mould with a smooth, glass-like surface. When you lay-up over the balsa layer, slight imperfections get amplified, and it is hard to get a smooth surface. Sanding helps, but I think the hull will take its imperfections all the way to Antigua.
The hull still needs two or three coats of epoxy resin as a hardener, as the polystyrene resin used in the fibreglassing process isn't suitable to exposure to the elements, and is usually protected by a gel coat. I can't apply a gel coat in this case, because gel coats don't cure in air.
In the photograph, you can see the closed-cell polyurethane foam seeping up from the keel, in three of the five compartments. CCPU foam is waterproof and can hold 27 times its own weight in water. This doesn't help the buoyancy of the boat in normal conditions, because an air-filled compartment would be just as effective. In fact, the foam weighs more than air (for a given volume), so it has a slightly negative effect on buoyancy. The advantage though, is it prevents those compartments from filling with water. Should the hull develop a leak in any of the three foam-filled compartments, the foam will prevent the water from sinking the hull. I'm tempted to fill the second compartment from the stern as well, but first I need to see how and where the electronics will fit in. At the stern, I will be cutting into the foam to make space for a mounting box for both servos.
Overall, we're on target. I will start sealing the tops of the compartments in the coming weeks, and commence work on the keel. I will feel more confident about our timetable once I see a completed hull sailing autonomously, and there's an awful lot of work to do between now and then.
Yannick from West Sails has agreed to design and cut the main sails, which is a big relief. Yannick is a single-handed sailor from France who arrived on these shores some years back, and has raised the standard of sailing in Galway, no end. He's also a dab hand at sail-making.
First though, I need to go and remove the excess CCPU foam and clean up the hull.
Search
Upcoming Missions
- Galway Bay Loop, Waiting for Vessel Availability
Recent Posts
- May 2023 (1 post)
- April 2023 (1 post)
- March 2023 (1 post)
- February 2023 (2 posts)
- March 2022 (3 posts)
- March 2021 (1 post)
- August 2020 (1 post)
- May 2019 (1 post)
- April 2018 (1 post)
- November 2017 (1 post)
- April 2017 (1 post)
- November 2016 (1 post)
- September 2016 (1 post)
- August 2016 (1 post)
- January 2014 (2 posts)
- October 2013 (7 posts)
- September 2013 (1 post)
- August 2013 (3 posts)
- June 2013 (3 posts)
- May 2013 (4 posts)
- April 2013 (3 posts)
- March 2013 (9 posts)
- February 2013 (8 posts)
