The Marvel of 3D Printing...
by Dermot Tynan in Microtransat
Posted on Thursday, May 30, 2013 at 08:00
So, while debating the different merits (or otherwise) of various mounting solutions, someone suggested using a 3D printer to actually print the housing for the masthead wind direction indicator. The more I thought about that plan, the better I liked it. As it happens, 091 Labs in Galway have a working 3D printer, from the Mendel90 family. What's more, they are trying to get a 3D printing service off the ground! I wasn't customer number one, but I was probably pretty close.
I used OpenSCAD to do the design. This was also recommended to me by the 091 Labs guys. OpenSCAD is a parametric modeling language. You define things in terms of cubes, cylinders and other shapes, and how they fit together. For example, a hollow cylinder is the difference of a larger cylinder and a smaller one. I found OpenSCAD pretty easy to use, and it didn't take long before I had a working model. The OpenSCAD source has been uploaded to github. I'll add the URL later on, when I find it.
As it happens, I had intended putting an all-round white light at the top of the mast. The plan was to turn this on at sunset, so that anyone else out on the water could see the boat. In keeping with the Colregs, I changed this to be a proper tri-light with red, green and white LEDs. This raises the power consumption, but it should help to make the boat more visible. It will also help to figure out which way the boat is heading. If you can only see a red light, it is going from your right to your left. If you can only see a green light, it is going from left to right. If you can see a white light, it is heading away from you. If you can see both red and green, it's heading straight for you!

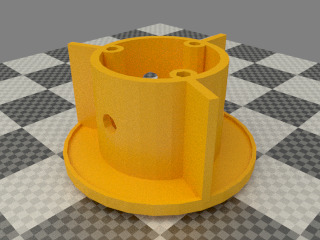
This picture is taken using Blender, an open source 3D animation and rendering package, using the OpenSCAD model as a source. The image shows how the unit was printed - in other words, upside-down. There is a slight "lip" on the edge of the top cap, just in case I want to insert any plastic lenses or filters. The three plastic tabs isolate each of the lights from each other, to prevent spill. They look like they are evenly spaced at 120 degrees each, but in fact the white light at the rear has an angle of 135 degrees and the red and green (port and starboard) lights have 112.5 degrees each. What the picture doesn't show is the mounting for the 624 sealed bearing at the top. I had debated using a smaller bearing, like the 694, but the 624 is much easier to find (and much cheaper!).
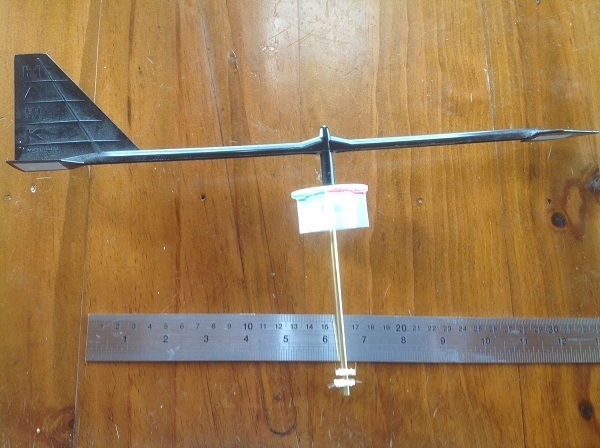
The 4mm shaft from the wind indicator comes through the top cap, and into the bearing. From there, a 4mm shaft collar keeps it and the wind indicator in place. The end of the shaft is flattened so that the flat edge has a width of 3mm in order to fit through the potentiometers. The "pots" in question are from Digikey, and are 3382H pots made by Bourn. I used a 2.5K pot, but really it should be 5K. Even though the pots have an unlimited range (no end stops), they only read in a 270 degree arc like regular pots. As a result, there's a 90 degree dead band when the pot won't read anything. In order to resolve this, I use two pots, 180 degrees out of phase. One on top of the other. As the pots have stand-offs and other bits on their underside, they are mounted upside-down and right-side-up. That way, as the wind veers, one pot will increase in resistance and one will decrease. As the two least-common points of sail are directly upwind and directly downwind, the pots are mounted such that the deadbands occupy one or other region. On a beam reach, one pot will read 1/4 scale, and one will read 3/4 scale, give or take. They are wired in series with two 2.5K resistors, to the 5V supply and then to ground. The wiper is used to read the voltage, between 0v and 2.5v. As chance would have it, the Atmel chip has an internally-calibrated 2.56V reference, so the voltages are measured with respect to that.
I haven't yet designed the base of the masthead light and wind direction indicator, but it won't be too challenging. 3D printers have an issue with overhangs, so I will have to print the base in two sections. One section will incorporate the base of the light and the mounts for the pots. The other will bolt through the first part onto the unit shown, and it will have the 8mm cylinder for the mast mounting.
Overall, I'm very impressed with the quality of the 3D printing, and have decided to print a variety of other components, including the mast base and the coupling for the forestay and shrouds. I may even print the cross-trees.
But first, I need to finish off the masthead light and wind direction indicator, and mount it outside where I can start taking readings and also looking at how it withstands the west of Ireland climate! Now is the time to find out it's not waterproof and the bearings are rusting, rather than somewhere off the coast of Africa!
Search
Upcoming Missions
- Galway Bay Loop, Waiting for Vessel Availability
Recent Posts
- May 2023 (1 post)
- April 2023 (1 post)
- March 2023 (1 post)
- February 2023 (2 posts)
- March 2022 (3 posts)
- March 2021 (1 post)
- August 2020 (1 post)
- May 2019 (1 post)
- April 2018 (1 post)
- November 2017 (1 post)
- April 2017 (1 post)
- November 2016 (1 post)
- September 2016 (1 post)
- August 2016 (1 post)
- January 2014 (2 posts)
- October 2013 (7 posts)
- September 2013 (1 post)
- August 2013 (3 posts)
- June 2013 (3 posts)
- May 2013 (4 posts)
- April 2013 (3 posts)
- March 2013 (9 posts)
- February 2013 (8 posts)
